We get asked a lot of questions about setting up artwork – many of our customers aren’t professional designers and it can understandably be pretty daunting. We’ve tried to put together a bit of a guide, as well as some template files for you to download and use. If you’re still confused then don’t stress – get in touch and we’ll do our best to help.
We accept .jpg and .psd files (bitmaps), as well as .ai, .pdf and .eps if you’re familiar with vectors. A .jpg or .psd should be setup to the following specifications:
Resolution: 300 dpi Colour mode: RGB Dimensions: 28cm x 41 cm (standard screen) or 40cm x 54cm (oversized)
This is really important as if you start off with a smaller file size your finished design won’t be of a high enough quality to print. If you’ve already done your design before reading this and it isn’t to these specs then you may need to redraw it.
Photoshop
If you’re working in Adobe Photoshop you can download our template files which are already setup correctly with an example layer included. Right click “save as” to download the relevant templates below.
[Download Standard Screen Template] [Download Oversized Screen Template]
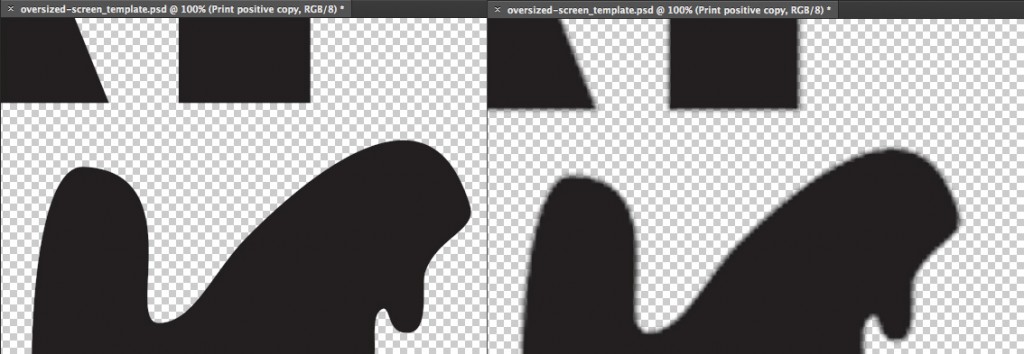
Look at the two examples of a one colour print above. Your artwork should always be clean and crisp when zoomed in at 100% as on the left hand side. If the edges are blurry as they are on the right hand side then we will not be able to make a good print from your artwork.
A quick fix for one colour artwork, if you’re using an existing file that is blurry is to use Image>Adjustments>Posterize and set the levels to 2, this is a very crude method of working and may not give the result you’re looking for, but is always worth a go before starting from scratch or editing manually.
If you’re working with hand drawn art then it will need to be scanned at a high resolution. You don’t need to worry so much about the edges being crisp but may need to spend time cleaning up any scuffs and smudges which are often very present in scanned drawings.
Adjusting the sliders in Image>Adjustments>Levels… can also be helpful here.
Your artwork should be the size that you want it printed. You can turn the Rulers on in the View menu to help determine this.
When you’re finished save the file as a jpeg, at the maximum quality (12) and send it our way. Alternatively, for multicolour jobs you could send a .psd with each colour on a separate layer if you have it – if not then a jpg will do just fine.
Illustrator
If you’re familiar with Adobe Illustrator then ensure your artboard is set up as the following:
Colour mode: RGB, Dimensions: 28cm x 41 cm (standard screen) or 40cm x 54cm (oversized), Portrait.
Your artwork should then fit within the artboard and be the size that you want it printed.
Make sure that you convert any text to outlines (right click text>Create Outlines) as this eliminates any font compatibility issues at our end.
Save your file in the default .ai format.
Colour
We offer 42 standard ink colours to choose from as standard – these can be found here. If none of these fit the bill then we also offer custom mixing using Pantone colour books for a small extra cost. Pantone is an industry standard system that ensures colours are matched perfectly, if absolute precision is required we recommend you obtain an up to date swatch book and supply us with a Pantone reference. In most cases though, where a reference isn’t supplied we’ll match the ink closest to what we see on screen – please bear in mind that our monitor may display colours slightly differently to yours.
Artwork guide
on this page are some basic tips to getting your artwork right. If you’re still unsure after reading through the page, then please email us for further help.